Месяц назад я помогал одной студентке с домашней работой по Кложе. Да, я тоже
удивился: есть вуз, где на первом курсе пишут парсеры на этом языке. Сомневаюсь,
что у студентов что-то останется в голове: после интенсива Кложи их перебросили
на Пролог, и в чем замысел такого обучения — загадка.
Тем не менее была домашка, которую нужно было сделать. Я помогал с двумя
заданиями: написать комбинаторные парсеры для разбора постфиксной и инфиксной
нотаций. Я всегда любил парсеры, и хоть не силен в них, не прочь что-нибудь
распарсить своими силами.
Там простой модуль с комментариями и базовыми парсерами. Также есть два модуля
demo1 и demo2. В одном пример с префиксной нотацией, во втором — с
инфиксной. Второй пример интересен тем, что там используется рекурсивный парсер,
и поэтому нужны конструкции declare и var.
Эти парсеры в высшей степени просты, и по-хорошему им нужна доработка. Скажем, в
случае ошибки возвращать не nil, а сообщение о том, что пошло не так. Это
сделано нарочно, чтобы акцент остался на главном: парсинге и комбинации
парсеров.
Now that the backend engine is complete, architecturally speaking, I'm getting increasingly eager to open the source. Itching, in fact. But as that will take a while, the least I can do for you is give you the WELCOME.md file from the source repo.
/ Peter
Welcome to Ooloi
Greetings, and welcome to Ooloi, the spiritual successor to Igor Engraver. If you're seeking yet another conventional music notation software, I'm afraid you've taken a wrong turn. Ooloi aims to be something rather different — and there's a story behind why that matters.
A Quarter-Century in the Making
Twenty-five years ago, I created Igor Engraver, which became rather successful in the music notation world. When that project ended, it left something unfinished – not just the software, but the understanding of what music notation software could truly become. Ooloi represents the completion of that circle, built with decades of accumulated insight about both music and programming.
In the intervening years, I became an AWS Solutions Architect Professional and created systems like Ocean and OpenSecOps. I have always thought in systems — this shift simply allowed me to give that instinct full rein, to focus entirely on designing foundations that can handle complexity and scale over time through elegant abstraction layers.
I've spent the better part of a year on Ooloi distilling everything I've learned into an architecture that doesn't just work, but works elegantly. This isn't my first attempt at solving these problems, but it's the first time I've had the right tools – functional programming, immutable data structures, enterprise-scale systems thinking, and the kind of patience that comes with experience – to solve them properly.
What is Ooloi?
Ooloi is open-source music notation software, designed from the ground up to handle complex musical scores with both finesse and power. Built in Clojure, it represents a fundamental rethinking of how music software should work.
What makes it different:
Temporal coordination: A traversal system that understands musical time
Collaborative by design: Multiple musicians can edit the same score simultaneously without conflicts
Memory efficient: Handles massive orchestral scores without breaking a sweat
Extensible architecture: A lean core augmented by plugins in any JVM language
Professional output: High-quality rendering and printing that works identically across platforms
Cross-platform: Mac OS X, Windows, Linux
Why Ooloi Matters
The world of music notation software has been rather stagnant for too long, content with incremental updates and feature bloat. Most existing software suffers from fundamental architectural problems that can't be fixed with patches – they require starting over with better foundations.
Ooloi solves problems that have plagued music software for decades: proper temporal synchronization, efficient collaborative editing, memory-efficient handling of large scores, and clean extensibility. These aren't just nice features – they're qualitatively different capabilities enabled by choosing the right abstractions.
The Architecture You'll Inherit
What you'll find here is the result of taking time to get the abstractions right. The backend is conceptually complete, with over 15,000 tests proving it works correctly. The temporal coordination system, the pure tree data structures, the STM-based concurrency – these represent solutions to genuinely hard problems.
But here's the thing: good architecture should be invisible to those who use it. The complexity is handled for you, hidden behind interfaces that make difficult things simple. You can focus on the problems you want to solve – whether that's creating plugins, improving the user interface, or adding new musical capabilities.
How You Can Contribute
If you're here, you probably have an interest in music, programming, or ideally both. Here's how you can be part of this:
Core Development: Help improve core functionality or add new features. Clojure experience is valuable, but the architecture is designed to be learnable.
Plugin Development: Create plugins to extend Ooloi's capabilities. The plugin system supports any JVM language — Java, Kotlin, Scala, even proprietary commercial plugins.
Documentation: Help make complex concepts accessible. The goal is clarity without dumbing down.
User Experience: Contribute to interface design. The aim is intuitive interaction that serves creative work.
Testing: Help ensure reliability. With this level of architectural complexity, comprehensive testing isn't optional.
Ideas and Vision: Share your thoughts on how we can improve. Constructive feedback shapes the future.
Start with the backend in the backend/ directory. That's where the architectural foundations live.
Explore the documentation, especially the ADRs (Architecture Decision Records) that explain why certain choices were made.
Use the REPL extensively. Clojure's interactive development environment is powerful for understanding how the system works.
Review open issues or create new ones. The architecture is solid, but there's always more to build.
What You're Joining
This isn't just another open-source project. It's the culmination of decades of understanding what music notation software needs to be, combined with the architectural discipline to build it right.
You're joining something that's designed to outlast its creator, to enable work that hasn't been imagined yet, to solve problems that matter to musicians and developers alike. The foundations are solid; now we build the future on top of them.
The architecture is complete, but the work is just beginning. There are plugins to write, interfaces to design, capabilities to add. Most importantly, there are problems to solve that only emerge when you put powerful tools in the hands of creative people.
A Personal Note
At 64, carrying more than five decades of programming experience and a parallel career as a composer, I've tried to encode into this architecture not just technical solutions, but the aesthetic judgments and performance intuitions that come from actually making music.
The creative energy that might have gone into another opera has found expression in software architecture. It's a different kind of composition – one that enables other people's creative work rather than expressing my own. In many ways, it's more satisfying.
This is what happens when you take the time to get it right, when you resist the urge to rush, when you're willing to solve the hard problems properly. The result is something that can grow and evolve through the contributions of others while maintaining its essential character.
Day-to-day programming isn’t always exciting. Most of the code we write is pretty straightforward: open a file, apply a function, commit a transaction, send JSON. Finding a problem that can be solved not the hard way, but smart way, is quite rare. I’m really happy I found this one.
I’ve been using hashp for debugging for a long time. Think of it as a better println. Instead of writing
(println "x" x)
you write
#p x
It returns the original value, is shorter to write, and doesn’t add an extra level of parentheses. All good. It even prints original form, so you know which value came from where.
Problem? It’s a different macro. We’ll need another one for ->>, too, so three in total. Can we make just one instead?
Turns out you can!
Trick is to use a probe. We produce an anonymous function with two arguments. Then we call it in place with one argument (::undef) and see where other argument goes.
Inside, we check where ::undef lands: first position means we’re inside ->>, otherwise, ->:
If we’re not inside any thread first/last macro, then no substitution will happen and our function will just be called with a single ::undef argument. We handle this by providing an additional arity:
There was once a time when a client asked me to add a rate limit to an HTTP API. I quickly identified three similar options, all of which could apply rate limiting via Ring middleware:
https://github.com/liwp/ring-congestion
https://github.com/killme2008/clj-rate-limiter
https://codeberg.org/valpackett/ring-ratelimit
However, no matter which one I used, the result was the same: “as soon as the rate limit was added, the entire web application became unusable and continuously threw errors.” After a period of debugging, I understood the root cause. The problem was with Compojure. Since Compojure matches routes one by one, when a stateful middleware is involved, it’s easy to encounter such anomalies: “an HTTP API that shouldn’t be rate-limited gets incorrectly rate-limited simply because it’s part of the route matching process.”
Once the essence of the bug became clear, the solution was simple: use the wrap-routes function, which can apply a middleware function after routes have been matched.
I believe this kind of bug can be attributed to a phenomenon I call “cognitive disalignment.” Here, Cognitive Alignment refers to the extent to which a system’s structure and semantics naturally align with the developer’s mental model. Ring, Compojure, middleware—these are all solutions for HTTP request handling. Most of the time, an application developer only needs a rough understanding of their semantics to develop software effectively. However, in the rate limiting case, the developer’s mental model failed to account for how Compojure’s route implementation interacts with stateful middleware, leading to bugs.
Since then, I’ve made it a habit to watch for whether a middleware is stateful. I also prioritize designs where route matching and handler binding are clearly separated—like in Reitit—and I prefer interceptor-style over decorator-style middleware.
Here is a definition of Cognitive Alignment:
Cognitive Alignment refers to the degree to which a system’s structure, semantics, and behavior align with the developer’s natural mental model, thereby reducing the cognitive burden of understanding and reasoning, and effectively preventing errors.
According to this definition, Cognitive Alignment offers two main benefits:
Reduced cognitive load
Error prevention
Let’s discuss the “error prevention” aspect further. Cognitive Alignment can be viewed as a form of error-preventative design. However, it differs fundamentally from inspectability. Inspectability is a contingent design—used after errors have occurred—whereas Cognitive Alignment is a preventative design—stopping errors before they happen.
Let’s now examine some examples in the Clojure language that demonstrate real-world Cognitive Alignment.
Concurrency Primitive
Clojure’s concurrency primitives are a prime example of Cognitive Alignment.
pmap stands for “parallel map.” The name and semantics are so tightly aligned that developers can understand and use it immediately.
future is another excellent example:
When we write (def result (future (do-something))), it expresses the developer’s intent clearly: “please start doing do-something right away, but I don’t need the result now—I’ll fetch it later.”
This kind of semantic Cognitive Alignment manifests in several ways:
Value semantics:future returns something you can deref. Developers don’t need to understand the implementation details of threads, tasks, or promises—they just know “I have something that will eventually hold a value,” which matches their mental model.
Clear dereferencing semantics: When you write @result, the meaning is crystal clear: “get the future value; if it’s not done yet, wait for it.”
In many traditional languages, like Java, developers must create execution units, manage thread lifecycles, and manually handle result sharing. Even when the developer’s intention is simple—“run something in the background and get the result later”—they’re burdened with thread pools, race conditions, and other implementation overhead.
with-macro
Beyond core syntax, a common macro pattern in the Clojure ecosystem also exhibits strong Cognitive Alignment.
Macros like with-open, with-out-str, with-redefs all share a common trait: they wrap a block of code and perform specific actions upon entering and exiting the block (e.g., resource management, I/O binding, temporary configuration changes).
For developers, “I want to set something up before running a block of code and automatically revert it afterward” is a very natural mental model. The naming and semantics of with- macros align perfectly with this need. This not only reduces what developers need to remember (with- is a clear hint) but also reduces the likelihood of mistakes (e.g., forgetting to clean up resources in a finally block).
Developers can even write their own with- macros as needed—such as with-temp-file, with-db-transaction—extending this cognitive pattern to form a structured, consistent system style that enhances maintainability and correctness.
Java Interop
Sometimes we need to leverage widely-used Java libraries, such as when reading or modifying Excel files. In such cases, there are usually several interop libraries to choose from.
Most of the time, I’ve experienced some decision paralysis: “Which should I choose? What are the criteria?”
From a Cognitive Alignment perspective, libraries usually fall into two broad categories:
Cognitive alignment with the underlying Java library design
Cognitive alignment with a particular Clojure style
At Gaiwan, we often lean toward the first. For example, we choose logback + pedestal.log or Docjure. While these choices may require learning how the underlying Java libraries work, they often come with simpler implementations and a consistent, straightforward mental model.
The Productivity Paradox
For a long time, I wondered: is it really necessary to use Reitit and interceptor-style middleware? Adopting these requires extra learning. Can the cost of that learning be repaid in the future of the project?
After some painful debugging experiences, I now believe it often can—because Cognitive Alignment helps prevent errors. The challenge is: you don’t always know how to measure that. How do you measure bugs you never made?
Conclusion
That elusive rate limiting bug occurred because the semantics the developer expected and the semantics the tool provided were misaligned. These kinds of bugs are often hard to detect. That’s why actively seeking Cognitive Alignment has become one of my top principles in system design and library selection.
When evaluating frameworks, libraries, or design patterns for a new project, we might ask:
“Does this interface or semantic match my intuitive mental model? In what cases might misaligned usage lead to mistakes?”
We can also incorporate Cognitive Alignment into our development guidelines:
Library selection: Does the library offer a single, consistent mental model?
Module development: Beyond having depth, does the module offer an API whose semantics align naturally with developer mental models?
Documentation: Emphasize the correspondence between mental models and implementation in documentation to help new team members ramp up faster.
In the end, although tools or patterns with high alignment may require upfront learning, this “preventative cost” is often worth it compared to the debugging time lost to semantic confusion and hidden implementation quirks. The cognitive alignment of a software system, while tacit in nature, is a key factor in reducing bugs and boosting productivity at the source.
I&aposd like to thank all the sponsors and contributors that make this work possible. Without you the below projects would not be as mature or wouldn&apost exist or be maintained at all! So a sincere thank you to everyone who contributes to the sustainability of these projects.
Fix #969: ^:clojure.core/eval-file metadata should affect binding of *file* during evaluation
Sync sci.impl.Reflector with changes in clojure.lang.Reflector in clojure 1.12.1
Fix :static-methods option for class with different name in host
Fix #973: support with-redefs on core vars, e.g. intern. The fix for this issue entailed quite a big refactor of internals which removes "magic" injection of ctx in core vars that need it.
Add unchecked-set and unchecked-get for CLJS compatibility
quickblog: light-weight static blog engine for Clojure and babashka
0.4.7 (2025-06-12)
Switch to Nextjournal Markdown for markdown rendering The minimum babashka version to be used with quickblog is now v1.12.201 since it comes with Nextjournal Markdown built-in.
Link to previous and next posts; see "Linking to previous and next posts" in the README (@jmglov)
#147: fs/unzip should allow selective extraction of files (@sogaiu)
#145: fs/modified-since works only with ms precision but should support the precision of the filesystem
cherry: Experimental ClojureScript to ES6 module compiler
Fix cherry.embed which is used by malli
deps.clj: A faithful port of the clojure CLI bash script to Clojure
Released several versions catching up with the clojure CLI
Other projects
These are (some of the) other projects I&aposm involved with but little to no activity happened in the past month.
Click for more details
- [CLI](https://github.com/babashka/cli): Turn Clojure functions into CLIs!
- [process](https://github.com/babashka/process): Clojure library for shelling out / spawning sub-processes
- [html](https://github.com/borkdude/html): Html generation library inspired by squint's html tag
- [instaparse-bb](https://github.com/babashka/instaparse-bb): Use instaparse from babashka
- [sql pods](https://github.com/babashka/babashka-sql-pods): babashka pods for SQL databases
- [rewrite-edn](https://github.com/borkdude/rewrite-edn): Utility lib on top of
- [rewrite-clj](https://github.com/clj-commons/rewrite-clj): Rewrite Clojure code and edn
- [pod-babashka-go-sqlite3](https://github.com/babashka/pod-babashka-go-sqlite3): A babashka pod for interacting with sqlite3
- [tools-deps-native](https://github.com/babashka/tools-deps-native) and [tools.bbuild](https://github.com/babashka/tools.bbuild): use tools.deps directly from babashka
- [http-server](https://github.com/babashka/http-server): serve static assets
- [bbin](https://github.com/babashka/bbin): Install any Babashka script or project with one comman
- [qualify-methods](https://github.com/borkdude/qualify-methods)
- Initial release of experimental tool to rewrite instance calls to use fully
qualified methods (Clojure 1.12 only0
- [neil](https://github.com/babashka/neil): A CLI to add common aliases and features to deps.edn-based projects.
- [tools](https://github.com/borkdude/tools): a set of [bbin](https://github.com/babashka/bbin/) installable scripts
- [sci.nrepl](https://github.com/babashka/sci.nrepl): nREPL server for SCI projects that run in the browser
- [babashka.json](https://github.com/babashka/json): babashka JSON library/adapter
- [squint-macros](https://github.com/squint-cljs/squint-macros): a couple of
macros that stand-in for
[applied-science/js-interop](https://github.com/applied-science/js-interop)
and [promesa](https://github.com/funcool/promesa) to make CLJS projects
compatible with squint and/or cherry.
- [grasp](https://github.com/borkdude/grasp): Grep Clojure code using clojure.spec regexes
- [lein-clj-kondo](https://github.com/clj-kondo/lein-clj-kondo): a leiningen plugin for clj-kondo
- [http-kit](https://github.com/http-kit/http-kit): Simple, high-performance event-driven HTTP client+server for Clojure.
- [babashka.nrepl](https://github.com/babashka/babashka.nrepl): The nREPL server from babashka as a library, so it can be used from other SCI-based CLIs
- [jet](https://github.com/borkdude/jet): CLI to transform between JSON, EDN, YAML and Transit using Clojure
- [pod-babashka-fswatcher](https://github.com/babashka/pod-babashka-fswatcher): babashka filewatcher pod
- [lein2deps](https://github.com/borkdude/lein2deps): leiningen to deps.edn converter
- [cljs-showcase](https://github.com/borkdude/cljs-showcase): Showcase CLJS libs using SCI
- [babashka.book](https://github.com/babashka/book): Babashka manual
- [pod-babashka-buddy](https://github.com/babashka/pod-babashka-buddy): A pod around buddy core (Cryptographic Api for Clojure).
- [gh-release-artifact](https://github.com/borkdude/gh-release-artifact): Upload artifacts to Github releases idempotently
- [carve](https://github.com/borkdude/carve) - Remove unused Clojure vars
- [4ever-clojure](https://github.com/oxalorg/4ever-clojure) - Pure CLJS version of 4clojure, meant to run forever!
- [pod-babashka-lanterna](https://github.com/babashka/pod-babashka-lanterna): Interact with clojure-lanterna from babashka
- [joyride](https://github.com/BetterThanTomorrow/joyride): VSCode CLJS scripting and REPL (via [SCI](https://github.com/babashka/sci))
- [clj2el](https://borkdude.github.io/clj2el/): transpile Clojure to elisp
- [deflet](https://github.com/borkdude/deflet): make let-expressions REPL-friendly!
- [deps.add-lib](https://github.com/borkdude/deps.add-lib): Clojure 1.12's add-lib feature for leiningen and/or other environments without a specific version of the clojure CLI
Since arriving in Mexico, Nu has established itself as one of the main drivers of change in the country’s financial sector. By offering simple, transparent products built around real people’s needs, we’re creating a new relationship with money and delivering tangible value in our customers’ financial lives.
This fast-paced growth has opened the door for professionals who want to be part of something bigger: helping us transform a constantly evolving market. To support this movement, we’re launching Purple Rockets, our talent acceleration program for early-career professionals who already have some hands-on experience.
The program includes tracks focused on intensive learning and work on high-impact projects. If you’re looking for a purpose-driven environment where you can grow and take on meaningful challenges, this could be your next journey.
Rather than being a conventional entry-level program, Purple Rockets is designed to empower professionals by giving them real responsibilities, continuous mentorship, and exposure to critical projects, preparing them for accelerated growth within Nu.
The initiative aligns perfectly with Nu’s strategic mission in Mexico and Latin America, ensuring the development of a pipeline of highly skilled professionals ready to contribute immediately and significantly to Nu’s long-term goals.
Roles and profiles we’re looking for
Purple Rockets seeks passionate, proactive professionals ready to further their career paths. Key positions include:
Software Engineers: Passionate about technology and innovation, ready to build scalable products.
Product Managers: Able to envision and drive product development strategies effectively.
Product Operations: Strategic thinkers who enhance operational efficiency and product performance.
Business Analysts: Experts in data-driven decision-making, translating analytics into actionable insights.
Purple Rockets has a structured selection process designed to identify high-potential candidates who are aligned with our values. Here’s what to expect:
Online test: Assesses logical reasoning and basic technical knowledge.
Group exercise: An opportunity to observe collaboration, active listening, and team-based problem solving.
Interview with the recruiting team: Focused on your journey so far, your motivations, and cultural fit.
Interview with Nu leaders: The final stage, where you’ll meet with managers from your area of interest.
We’re looking for curious, proactive people who are committed to continuous learning and ready to grow with us.
Why join Purple Rockets?
Joining Nu means becoming part of a dynamic, transformative organization that prioritizes innovation, inclusion, and impact. At Nu, you’ll:
Drive growth with technical and business acumen: You’ll be strongly encouraged to combine your technical knowledge with business language, learning to navigate the organization and influence key aspects of the company’s exponential growth. This program is designed for tech professionals who want to apply their skills to broader business challenges.
Work in a diverse, inclusive environment: We value different perspectives and foster an inclusive atmosphere.
Innovate and impact lives: You’ll contribute directly to innovative solutions, significantly impacting customers’ lives in Mexico and across Latin America.
Program Structure
The Purple Rockets program is structured into three distinct phases:
Launchpad & Ignition
This initial two-month onboarding phase immerses participants fully into Nu’s culture and working environment. It starts with a three-week, intensive, in-person cultural immersion, followed by five weeks of specialized, function-specific training.
Participants receive personalized mentorship and guidance from experienced professionals, preparing them comprehensively for future challenges.
Orbital mission
This ten-month phase provides substantial hands-on experience, enabling participants to tackle real-world problems across various teams through rotations every three to five months. Regular mentorship from seasoned leaders, combined with structured performance evaluations, ensures continuous learning and development.
Moonwalk
In these final six months, participants take on greater responsibilities and autonomy in their roles. This phase is designed for you to solidify your skills and demonstrate your full potential, and it’s where you’ll prove your progress and demonstrate your mastery, showcasing your readiness to function independently as a key contributor at Purple Rockets. Your performance during this acceleration phase will play an important role in shaping your growth and future opportunities within the company as a full-time employee.
Ready to make an impact?
We encourage you to apply even if your background doesn’t perfectly match every listed criterion. At Nu, your potential, passion, and creativity matter most.
Ready to make an impact? Check the details of the positions and hiring requirements in the job post available here.
This week, our Apropos episode is on Thursday. We invite Peter Strömberg to the show!
The Clojure/conj CFP is open! If you’re looking to speak, go apply! I’ll be there giving a workshop on domain modeling in Clojure.
The economic inevitability of AI
The current hype around AI triggers our cognitive biases and makes it hard to take an objective look. It’s just hard to be certain about anything. On what timeline will AI take our jobs? What threats does AI pose to culture and civilization? Will AI help us manage and mitigate climate change or will it exacerbate it? There are a lot of difficult questions. But there’s one thing I’m fairly confident about, and I think it’s worth taking the time to clear the air about it. I’m certain of the economic inevitability of the AI industry.
The future is clear. It has replayed itself many times in the history of business, and certainly in the history of the computing industry. The future is this: Some company (probably OpenAI but we can’t be sure) will capture a significant percentage of the revenue of white-collar labor. Just like Amazon now captures a significant portion of online commerce, just like AWS takes a cut of most startup’s revenue, the winner of the AI race will extract a fee from most every white collar worker. Like licenses for Microsoft Office or Windows, companies will pay for access to AIs they believe will make their employees more productive.
Companies will gladly ask their employees to use AI if it speeds up their work. Businesses want to be competitive, so as other companies gain efficiencies from their use of AI, they’ll need to do it, too, to keep up. It’s a rational choice. I’d ask my company to do it, too, if I were the CTO. Eventually, most employees doing knowledge work will be using AI. And the employers will be paying licenses to OpenAI (or whoever wins).
We live in a world where winner-takes-all is the natural course of things. Slight advantages compound. The big company can acquire, undercut, or outlast the small company. Eventually, the market sorts out the winner with ~80% market share. The rest of the companies fight over the remaining 20%.
In short, one company will have 80% market share, and the market is AI accelerators for knowledge work. Microsoft had “A computer on every desk.” OpenAI will have “An AI on every desk.”
Once the 80% winner is found, the enshittification can begin. These companies are fueled by massive investments. They can sell services well below cost for years. OpenAI forecasts losing $44 billion in the next four years. But in 2029, they can start experimenting with how to turn all those customers, now dependent on their services, into profitable clients, likely by raising prices, degrading service, or inserting ads. OpenAI will create a few trillionaires, many billionaires, and uncountable millionaires on their ascent.
If you’re looking to make money, hitch yourself to the rise of these AI giants. You could be one of the millionaires by being one of the companies renting the shovels during this gold rush.
History is repeating. Personal computers were supposed to liberate us. But what we didn’t realize when the digital dream of personal freedom was still alive was that the companies who amassed more computers and more data would be more free than others. The computer giants donated computers to school.
Similarly, AI is currently sold as a liberating force. It is “democratizing” programming. It’s giving everyone a cheap therapist. They are more reliable companions. But we know that the productivity gains and the huge profits will accrue to the employers and to the AI companies most of all. OpenAI and the others are making products that are sure to become the next essential tool for thought work. Employers will demand that we use them. OpenAI will take rent on all of the work we do. And it will become enshittified. With that inevitability out of the way, we can talk about the more nuanced ideas in the next emails, including some positive ones!
If you’re a Java dev, you’ve probably used or heard of Project Lombok, Jakarta Bean Validation (JSR 380), AutoValue, MapStruct, or Immutables. They all help reduce boilerplate and add declarative magic to your code.
And I’m sure you’ve come across the term “macro”, usually explained in some academic or cryptic way. But here’s the thing: these libraries are simulating macro-like behavior — just without true macro support.
What Are Macros Anyway?
In languages like Lisp or Clojure, macros are compile-time programs that transform your code before it runs. They let you:
Rewrite or generate code
Build new control structures
Create entire domain-specific languages
They're basically code that writes code — giving you full control of the compiler pipeline.
Java’s “Macro” Workarounds
Java doesn’t support macros. Instead, it uses annotation processors and code generation tools:
Lombok’s @data → generates constructors, getters, and equals()/hashCode()
Jakarta Bean Validation (@min, @notblank) → declarative validation
AutoValue → immutable value types
MapStruct → type-safe mappers (my personal favorite)
Immutables → generates immutable types with builders
Spring Validation → framework-driven validation
These are powerful tools — but they can’t create new syntax or change how Java works at its core. They're still working within the language, not extending it.
What Real Macros Look Like
In Clojure, you can define a new data structure and its validator in a single macro:
No annotations. No libraries. No ceremony.
Just your own language feature, built with a macro.
TL;DR
Java’s toolchain simulates macro-like behavior through annotations and codegen. But if you want to invent language, write less boilerplate, and build smarter abstractions — macros in languages like Clojure or Racket offer the real deal.
Java gives you a powerful toolkit. Macros give you the power to build your own.
Inspired by Paul Graham's essay collection "Hackers & Painters"
This is the June project update for four of our Q2 2025 Funded Projects. (Reports for the other two are on a different schedule). A brief summary of each project is included to provide overall context.
Brandon Ringe: CALVA
A new REPL output view for Calva, which is a webview in VS Code. The webview will allow us to add more rich features to the output webview, while also providing better performance.
Bozhidar Batsov: CIDER
Provide continued support for CIDER, nREPL and the related libraries (e.g. Orchard, cidernrepl, etc) and improve them in various ways.
Siyoung Byun: SciCloj Building Bridges to New Clojure Users
Scicloj aims to improve the accessibility of Clojure for individuals working with data, regardless of their programming backgrounds. The project aims to develop standardized templates to encourage greater consistency across the documentation of existing Scicloj ecosystem libraries, making those libraries more robust and user-friendly.
CALVA: Brandon Ringe
Q2 2025 $9K. Report 2. Published June 16, 2025.
Since the last project update, several improvements have been made to Calva’s new output view.
One of those improvements is a significant performance boost with high frequency output, such as logging to stdout hundreds or thousands of times within a minute. I realized that replicant (and rendering libraries like it), which is an awesome library, is not well-suited for this kind of use case. So I switched to using the DOM API directly, which is much faster and more efficient for this purpose.
Here’s a list of the changes to the output view since the last project update:
Q2 2025 $9K. Report 2. Published June 17, 2025.
The last month was another strong one for CIDER and friends, which featured many releases across the different tools and libraries. Below are some of the highlights:
Adds clojuredart-mode and jank-mode for better support of ClojureDart and Jank
Also features a couple of small fixes
clojure-ts-mode 0.5 was the biggest news in the past month for several reasons
It uses an experimental version of the Clojure Tree-sitter grammar that allows us to deal better with Clojure metadata
It features support for font-locking embedded JavaScript code in ClojureScript (and C++ code in Jank)
Introduces the clojure-ts-extra-def-forms customization option to specify additional defn-like forms that should be treated as definitions (as it’s hard to reliably infer those)
It features some simple built-in completion powered by Tree-sitter
CIDER also saw some work, but no new release. You can expect in the next release:
better support for clojure-ts-mode
more improvements to the Inspector
user manual (documentation) improvements
On top of this, I’ve been reviewing the data from CIDER’s survey, improving the CI setups of various projects, providing user support and working on some ideas about restructuring the documentation of CIDER and nREPL to be more approachable. The process for streamlining (slimming down) CIDER, cider-nrepl and orchard is ongoing as well. (e.g. we’ve stopped bundling print engines with cider-nrepl and now those have to be supplied by the users)
clojure-ts-mode is shaping up really nicely and has mostly matched the features of clojure-mode. On top of this it does a few things better than clojure-mode, so I’m optimistic that we’ll mark it as ready for general usage before the end of the year. We’ve expanded the design docs recently and I think they can be useful both to potential contributors and to other people looking to create Tree-sitter based major modes. I’m also working in the background on a couple of article for best practices when working with Tree-sitter in Emacs.
Thanks to Clojurists Together for their continued support of my OSS work! You rock!
Jank: Jeaye Wilkerson
Q2 2025 $9K. Report 2. Published June 17, 2025.
Thank you!
Hi folks! Thanks so much for the sponsorship this quarter. Clojurists Together is my largest form of income this year, which makes this even more special.
Seamless interop
In the past month, I’ve implemented:
Many, many tests for the new interop functionality
Calling global C++ functions
Calling C++ member functions
Accessing C++ member variables
C++ reference semantics, including automatic referencing and dereferencing
Dozens of C++ operators
You can find all of the details in my latest blog post, here.
Next up
In the final month of this quarter, I aim to expand the test suite, fix the
remaining known bugs, add manual memory management support, better template
support, full destructor support, and finally the portability fixes necessary to
make all of this work on both macOS and Linux.
SciCloj Building Bridges to New Clojure Users: Siyoung Byun
Q2 2025 $2K. Report 1. Published June 25, 2025.
Work Completed, In Progress and Further Plans
CFD Python into Clojure Project
I initiated the CFD Python into Clojure
project, which translates computational fluid dynamics (CFD) learning steps from Python
into Clojure. The project also includes a currently evolving notebook page that shows the learning steps progressed so far for the project.
This project showcases interactive, real-world scientific computing examples
with an initiative to diversify the set of data science use cases available in Clojure.
I am working toward completing and polishing the project as a featured example of Clojure’s
capability in handling scientific computing and numerical simulation use cases. I am planning to discuss the results and experiences at a future SciCloj Light Conference.
Conference Presentation at SciCloj Light #1
I presented a talk at SciCloj Light #1,
highlighting the progress (implementing one-dimensional CFD using Burgers' equation), simulations, and future directions from the CFD Python into Clojure initiative.
The talk demonstrated how Clojure can serve as a powerful tool in data science and data analysis.
Conference Reflections and Scicloj Community Video
I co-authored and released a video
summarizing the SciCloj Light #1 conference experience, along with publishing
a written conference survey to gather feedback and reflect on future SciCloj Light conferences with Daniel Slutsky.
The video discusses the preparation process, key takeaways, and future directions
for Scicloj as a community-driven initiative and as an individual contributor.
Community Outreach Initiative for Broader Participation
I initiated and participated in a community discussion on Clojurian Zulip
to encourage Scicloj contributors and users to present at external data science conferences
and share their experiences using Clojure and Scicloj libraries for their data science work.
This outreach aims to amplify Clojure’s visibility in broader scientific and data communities to obtain more attention and bring newcomers to the community.
Documentation Improvements for Noj
I joined as one of the maintainers of Noj, an out-of-the-box Clojure library designed to simplify data science workflows.
Currently, I’ve been focusing on improving the library’s introductory documentation, setup guides, and use cases in notebooks to make it more welcoming and useful to newcomers.
There are already good use cases, ideas, and documentation in the library, so my main goal is to make those resources more coherent, consistent, and organized to be easily searchable.
Once we have well-tailored documentation in place for Noj, we hope to roll out
the same documentation template for the rest of the Scicloj libraries.
Library Documentation Review and Feedback Collection
I am actively gathering feedback on gaps and pain points in the documentation of various
Scicloj libraries through the Clojurian Zulip channel.
Improving “Getting Started” Experiences
I am continuing to improve the beginner documentation and setup processes across Scicloj libraries, with a goal of creating a smoother onboarding experience for users with diverse backgrounds.
Organizing ‘macroexpand’ Gatherings
I will co-organize a series of regular online community meetups called macroexpand gatherings.
These are aimed at welcoming both new and existing Clojure users and will foster communication across communities working on professional data projects (data engineering, analysis, visualization, etc.)
and identify shared challenges and opportunities for collaboration.
By hosting a space to discuss the current status of the community/individuals and challenges together, we hope to prioritize our todos and initiatives better and create actionable items to move forward.
The question came up whether something like the grove << fragment macro could apply to any of the CLJS react wrappers? I said yes, and didn’t really want to get into it. Curious as I am though that question nagged at me and I wanted to know for myself. So, since I’m preaching about Lessons learned and not really wanting to talk about shadow-grove, let use talk about reagent for a bit. I don’t want to put reagent in a bad light or anything, I want to highlight how much optimization potential is left within easy reach.
Given that I have already written the actual << macro, how hard could it be to translate this to reagent? To do an actual proper implementation I can’t really say. Something basic that would satisfy my basic testing setup? Not that hard. Of course, this isn’t nearly as comprehensive as the React Compiler would do, and neither is it supposed to be. I just wanted to test whether this actually provides any kind of speedup at all.
TL;DR: Yep, it gets faster.
Reagent Baseline
I have to emphasize that this setup isn’t anything close to how you are actually supposed to use reagent. This is intentionally naive and probably breaking some rules. I wanted this to measure against React 19 and I don’t even know if that is officially supported by reagent. I did the same testing methodology as my previous post. Some basic hiccup, turned into react elements which then get rendered by react. I was shocked how slow this is during development. Like, 90ms without any slowdowns. Which emphasizes the fact that creating very large hiccup structures is bad. I know I should have used components and not actually do everything as on big hiccup structure. But this was only during dev, release actually looks much more reasonable. Reaching about ~1.6ms with no slowdowns, but what about 20x slowdown?
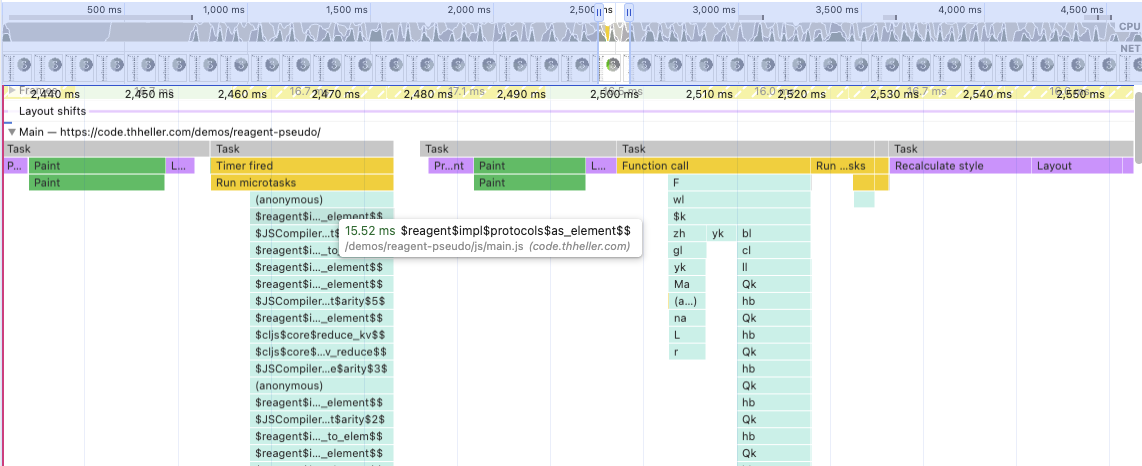
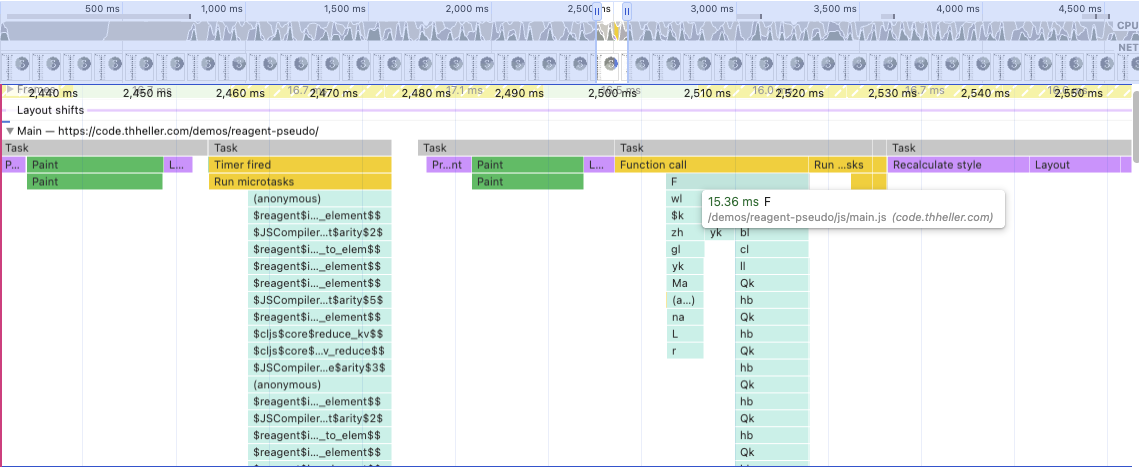
Due to react not rendering when I tell it to, but rather delaying itself the trace is actually split in two. One is the actual reagent/as-element call, which converts the hiccup to react elements. And then a bit later actually react rendering it.
So ~31ms, but with a bit of variance. Seems the go between 20-40ms, in rather unpredictable ways.
Regardless, as always feel free to get your own numbers via the demo page.
Reagent With Macro Help
Same as in my earlier post, the only real change was wrapping all hiccup forms in the << macro I wrote. This macro does two things.
First, it tries to find completely constant parts of hiccup that it can pull out and “memoize”. In the example code that for example the entire :div holding the :svg, as well as the :thead bit. These only get created once, so the hiccup->react element conversion is only done once, and react finds identical? elements and I assume skips some work.
Second, using the same strategy the macro in shadow-grove uses it analyzes the hiccup and looks for dynamic parts. So, for example from this bit:
It identifies the $col-num as “constant”, since it is a def in the local namespace, but (:id row) and (format-temp (:target row)) are code blocks. Code needs to actually run, so instead it basically creates references to these things. Simplified it generates a function for this instead, that roughly looks like
In the place of the actual fragment, it then emits a call to a helper function, which will eventually call the above function, but also memoize it based on the passed data vector.
The two helper functions you can find here. Admittedly naive and all full of bugs, but to be quite honest I don’t care about react at all, so the only goal here was to find out if this all can actually apply to reagent with any meaningful benefits.
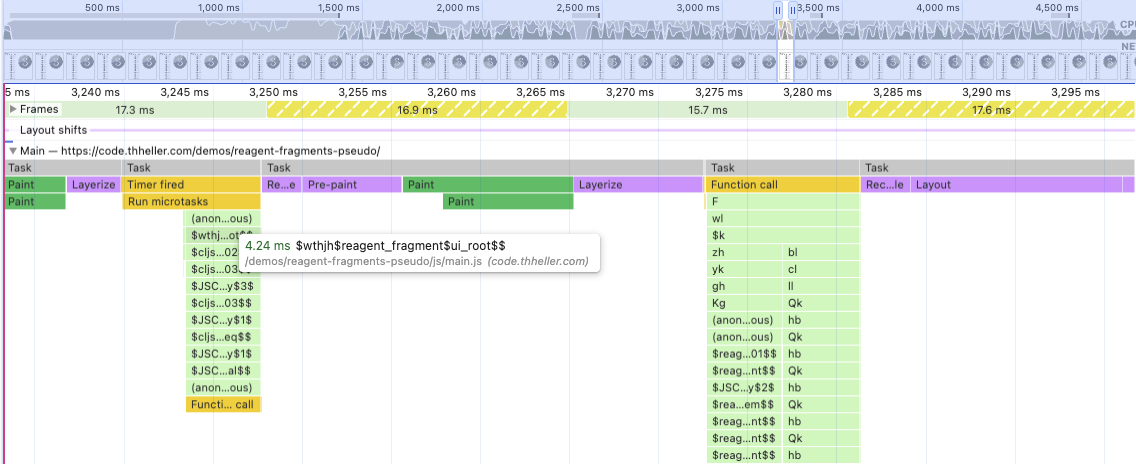
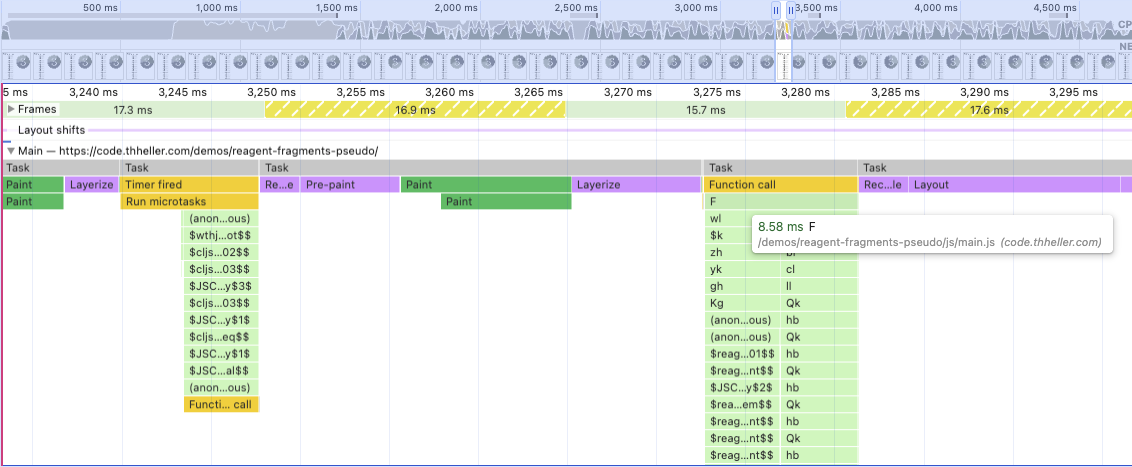
Running this variant again with a 20x slowdown looks something like this:
Again, react still runs when it wants, and as you can see there is now some as-element conversion happening as part of the react expansion. You’d have this normally anyway due to the introduction of some intermediate “components”, but it makes it a bit harder to distinguish where actual time is spent now. No longer has clear boundaries between reagent/react, but that is fine, you’d never have that in the first place if not for my deliberate test setup.
Either way that is ~13ms, again with quite a bit of variance, but still a measurable difference. Not too bad for a couple of hours of macro tinkering.
Conclusion
Should you use this? Absolutely not. This was only to satisfy my own curiosity. I’m almost certain that some of the other CLJS wrappers do something similar or smarter already. It has been many years since I actually used react myself and I have no interest in turning this into a proper library, or actually optimizing this to its full potential. I’m satisfied to have some evidence that these ideas actually do apply.
Again, I know that I could have gone with a few simple components and probably get about the same or better speedup with that. The goal was testing whether introducing a macro can help “fix” my naive approach.
If done properly you could do what React Compiler does completely within a macro, with no extra help from the compiler at all. And quite honestly anyone using react via CLJS probably should. Otherwise, future comparisons between CLJS and React-Compiler-compiled JS will look embarrassing, even more than they currently already do. Maybe I’m wrong and the React Compiler will actually be usable with CLJS in some way, but I have my doubts, especially since I have no clue how I’d integrate it with shadow-cljs.
Happy to discuss this with anyone equally performance obsessed. ;)
We mentioned last time that the result of combining more and more events will approach the normal distribution, regardless of the shape of the original event distribution. Let’s try to demonstrate that visually.
Our previous definition of a random event is an example of a uniform distribution:
I find these visuals surprisingly powerful because you can see the original distribution “morph” into this characteristic shape.
The normal distribution holds a unique place in mathematics and in the world itself: whenever you combine multiple independent and identically-distributed events, the result will converge to the normal distribution as the number of combined events increases.
Welcome to the Clojure Deref! This is a weekly link/news roundup for the Clojure ecosystem (feed: RSS).
The Clojure/conj 2025 Call for Presentations is open now until July 27! We are seeking proposals for both 30 minute sessions and 10 minute lightning talks.
bud - A minimalist ClojureScript DOM library with precise, signal-driven reactivity for single-page applications
tufte3.0.0 - Simple performance monitoring library for Clojure/Script
beeld - Get the metadata associated with an image. Also contains image utilities: filesize, scale, etc.
splint1.20.0 - A Clojure linter focused on style and code shape.
edamame1.4.31 - Configurable EDN/Clojure parser with location metadata
clojobuf0.2.1 - A clojure(script) library that dynamically interprets protobuf files (.proto) and use the resultant schemas to encode/decode plain clojure(script) map into/from protobuf binaries.
rubberbuf0.3.2 - A clojure(script) library to parse protobuf definition (.proto) into abstract syntax tree (AST).
calva-power-tools0.0.10 - A VS Code Extension providing commands for extra powerful things in the Clojure ecosystem
ruuter 1.3.5 - A system-agnostic, zero-dependency router
honeyeql1.0.6 - HoneyEQL is a Clojure library enables you to query database using the EDN Query Language.
replicant2025.06.21 - A data-driven rendering library for Clojure(Script) that renders hiccup to DOM or to strings.
qclojure0.3.0 - A functional quantum computer programming library for Clojure with backend protocols, simulation backends and visualizations.
overarch0.39.0 - Overarch provides a data model for the holistic description of a software system, opening multiple use cases on the model data. Supports C4 and UML diagram generation with PlantUML.
calva-backseat-driver0.0.14 - VS Code AI Agent Interactive Programming. Tools for CoPIlot and other assistants. Can also be used as an MCP server.
polylith0.2.22 - A tool used to develop Polylith based architectures in Clojure.
pretty3.4.1 - Library for helping print things prettily, in Clojure - ANSI fonts, formatted exceptions
aleph0.9.0 - Asynchronous streaming communication for Clojure - web server, web client, and raw TCP/UDP
babashka1.12.204 - Native, fast starting Clojure interpreter for scripting
conjtest0.3.0 - Run tests against common configuration file formats using Clojure!
nvd-clojure5.1.0 - National Vulnerability Database dependency checker for Clojure projects
sci0.10.47 - Configurable Clojure/Script interpreter suitable for scripting and Clojure DSLs
We designed ClojureDart maps to be more regular and deterministic than Clojure’s, making it easier to optimize batch operations.
For a while, that potential sat untapped, until a couple of months ago (yeah this issue sat in draft for too long).
Today we are going to talk maps, accelerating merge and introducing a new function, a real killer: join-with.
We’re currently available for new work — short or long term.
You can work with either one of us, or both, depending on what you need. From a quick brain-pick session to a full prototype, MVP, or long-term project: we’d love to hear what you’re working on.
When we’re not helping clients, we’re working on ClojureDart and Paktol — the positive spending tracker where money goes up 📈, we’ve just released a major new feature (anticipations) which makes it a complete and cohesive product.
Maps implementations differences
Clojure maps are conceptually tries with a 32 fan out. (The clever parts are how we navigate this trie using a hash and how we store sparse children arrays.)
Doing boolean operations on tries is conceptually easy: for a given child slot in two nodes, process the matching subtrees recursively, possibly short-circuiting on identical nodes or nils.
Clojure maps
In practice Clojure hash maps have three kinds of nodes: bitmap nodes, array nodes, collision nodes. Plus a node may need to be compared to an inline key-value pair. This makes a lot of cases to account for — and that's without counting on the fact that small maps are not hash maps but array maps.
ClojureDart maps
For ClojureDart I wanted to have a simpler hash map implementation:
No internal polymorphism: it has a single type of nodes: bitmap nodes (they are even reused for collision nodes — a collision node is just a node at maximum depth).
History independence: for a given keyset the layout is deterministic.
Nodes store the number of items they contain (this speeds up merging disjoint maps a lot).
Determining if a node is editable (owned by the transient) is done in a stateless way.
ClojureDart literal maps
What about small maps? In ClojureDart they are hash maps too, however we have one trick: literal maps for which keys are stable (strings, symbols, numbers, booleans etc.) have their layout determined at compilation time (by a macro).
This means that for many small maps (where there's no collision on the lowest hash code 5 bits — Birthday paradox applies: 50% of 7 entries maps) we allocate an array containing the interleaved keys and values in the right order (determined at compile time) with the right bitmap (determined at compile time). Making it almost as cheap as allocating an array map.
If your map requires two nodes or more they will be predetermined in the same way.
If not all your keys have safe hash code, then the infringing keys will be added at runtime using normal transient association.
Fast structural merge
The first function to benefit from ClojureDart simpler maps was merge — or conj between maps, as it's often overlooked that (conj {:a 1} {:b 2 :c 3}) is legit.
What does it mean for merge to be accelerated? First it means that (merge small-map big-map) is as fast as
(merge big-map small-map).
It also means that a lot of hash computation and bit-twiddling and pointer traversal is avoided.
Together with predetermined literal maps this has some surprising results: (conj m {:a x :b y}) is now the fastest way to associate two keys on a map!
Generalizing merge-with
Instead of accelerating merge-with, we accelerated a new function join-with which is "merge-with with too many functions".
join-with can express any boolean operation on maps (and sets) combined with transformation and filtering, in a single lockstep walk of both maps.
(combine va vb) combines values when k belongs to maps a and b.
(fa va) is the value when k belongs only to map a.
(fb vb) is the value when k belongs only to map b.
where? is a predicate applied to values returned by combine, fa or fb to determine if the entry should be included in the result.
Any of combine, fa or fb can be nil to exclude the corresponding keysets. identity is a special value for fa and fb: it's recognized and treated more efficiently than (fn [x] x).
-join-with was interesting to design: like equals or equiv it expects another argument "compatible" with this. We are at the limits of single dispatch. Anyway the solution we chose is to hard code compatibilities (hash maps and hash sets are compatible but this can't be extended) and to have -join-with to return nil on incompatible arguments so that slower path or exceptions could be thrown.
Conclusion
join-with is a very versatile function and we'd like to extend it to sorted collections. However we would also like to explore other ways to process several maps at once, like a sequence or iterator which allows to seek up to another sequence or iterator in a compatible collection (here compatible meaning iteration order).
Nubank Engineering Meetup #12 offered valuable insights into the company’s technical evolution — how we’ve reshaped our platforms, systems, and career paths over the years. The conversation was led by Bel Gonçalves, now a Principal Engineer at Nubank, who shared the lessons learned over nearly a decade building technology at the company.
More than an inspiring personal story, the meetup gave attendees a deep dive into the topics that shape our daily engineering work — from architectural decisions to the development of large-scale technical career structures.
From a single product to a platform-based architecture
Nubank’s original architecture was simple, like many early-stage startups: built for a single product (credit card) in a single country (Brazil). But as we expanded by adding financial services, entering new markets, and navigating diverse regulations, this structure had to evolve.
The answer was platformization. The challenge was to build systems flexible enough to support different products, across multiple countries, with unique requirements, without rewriting everything from scratch each time. This meant clearly separating product-specific logic such as localized business rules from reusable components such as authorization engines and card and account management.
By making services more parameterizable, we accelerated development, reduced redundancy, and maintained the resilience needed to operate at scale. The journey included tough decisions, such as extracting critical code from legacy services in production, rewriting foundational components, and avoiding overengineering by balancing generality with simplicity.
Platforms that power scalability
One of the clearest examples of this shift was the creation of the card platform, which decoupled debit and credit functionalities from specific products or geographies. What used to be handled by a single service like the former CreditCardAccounts that as the name suggested, was specific to credit card, was restructured and endup derivating other services more flexible and capable to adapt to different realities, such as Brazil’s combo card and Mexico’s single cards for debit and credit.
Another critical milestone was the evolution of our Authorizer system, responsible for real-time transaction approvals. As one of the most sensitive parts of our operation, its migration from physical data centers to the cloud required low latency and high availability, especially to maintain communication with partners like Mastercard. This project required not only technical excellence but also meticulous planning to avoid any disruption to customers.
Standardization as the backbone of consistent engineering
To support engineering scalability, Nubank adopted a consistent approach rooted in standardization. All teams work with Clojure, build microservices, and favor asynchronous communication. This shared foundation encourages reuse, lowers cognitive load, and enables more predictable architectural evolution.
Our use of both Clojure and the Datomic database, both rooted in functional programming, also reflects a focus on safety and predictability. Immutability, for example, is not just a design choice—it’s a necessity to prevent harmful outcomes from incorrect system states.
This level of consistency helps teams replicate proven patterns and best practices across different contexts, accelerating product and market expansion.
The technical career path at Nubank
As our architecture has matured, so too has our technical career framework. The path includes clear milestones: engineer, senior, lead, staff, senior staff, principal, and finally, distinguished engineer. Each level brings increasing responsibility, not just in code, but in system-wide and strategic influence.
Unlike traditional models that nudge engineers into management roles, Nubank supports the growth of deep technical careers. Engineers can specialize in a given technology or take on broader roles, becoming cross-team technical leaders, especially in products or platforms with many stakeholders.
We also encourage movement between tracks. Experience in people leadership, for instance, can add perspective and empathy to those returning to hands-on technical work, strengthening business understanding and collaboration skills along the way.
Engineering at the intersection of tech, product, and business
In our cross-functional environment, engineering goes far beyond code. Engineers are involved in product decisions, help shape go-to-market strategies, and openly discuss trade-offs with stakeholders from other disciplines. Collaboration with data, design, and business teams is part of our daily rhythm, improving both product quality and creative thinking.
This collaborative model means engineers need not only technical depth, but also strong communication, active listening, and negotiation skills.
Culture, trust, and inclusion as core pillars
The architectural structure of Nubank is not just built on services and platforms — it’s built on people. Teams are the core unit of our company, and collaboration is the most essential skill. Behind every critical system, there’s a trusted network where different voices, backgrounds, and ways of thinking come together.
Building strong and diverse teams is part of our culture — and that’s why it’s a strategic priority for us. In initiatives like the creation of the NuCel team, we actively seek to build teams made up of people with different abilities, experiences, and perspectives across functions like engineering, product, design, and more.
Environments like this lead to more complete, empathetic, and relevant solutions for the people who use our products.
Balance and ownership in a high-complexity environment
With over 100 million customers, a growing product portfolio, and operations in multiple countries, pressure and complexity are part of our daily challenges. To manage this, our engineering team relies on mature processes, transparent communication, and a culture of autonomy with accountability.
Planning cycles balance short- and long-term goals. Product timelines are co-developed with engineering, with technical feasibility, resource constraints, and risk trade-offs always in the equation. It is common to adjust scope or renegotiate deadlines, always with a focus on delivering value sustainably.
A culture anchored in learning
If one principle guides everything we do at Nubank Engineering, it is continuous learning. Whether it is tackling a massive refactor, launching a new platform, or navigating the next career step, the mindset is always to stay curious and stay adaptable.
It is not just about mastering a tech stack or leading high-impact projects. It is about being where innovation happens, even when that means stepping out of your comfort zone.